Hello. How may we help you?
- Exploring Mood Board
-
Getting Started
- Configuring Your Management Module
- Create & Configure A New Organization
- Creating a Customized Address
- Mastering Advanced Search and Filters
- Understanding Your Organization's Homepage
- Understanding Role Function
- Dashboard Overview: Key Insights for Organizational Decision-Making
- Changing The Language
- Changing Your Password
- Editing Your Profile
- Feedback and Requests
- Frontier.cool Privacy Policy
- Managing Your Profile Menu
- How to Activate Two-step Verification
- Are all of my digital fabrics shared publicly?
- Does Frontier.cool’s TextileCloud™ offers a free trial plan?
- How do I change the language?
- How do I send feedback or make a request?
- How does Frontier.cool protect my privacy and keep my data secure?
- How does Frontier.cool’s TextileCloud™ accurately generate physical properties?
- How does Frontier.cool’s TextileCloud™ generates accurate texture maps?
- Why can't I download other people's 3D material files?
- Why is my asset upload unsuccessful or canceled?
- How does Frontier.cool’s TextileCloud™ generates environmental impact data with Eco-Impactor™?
- Accessing and Copying a Shared Collection
- Adding Assets to Collection in the Workspace
- Creating and Accessing Collections
- Creating and Managing a Private Digital Library on an Embed Page
- Managing Collections
- Managing Your Workspace
- Sharing Assets and Collections
- Edit Your Collection’s Cover Image
- Reach Out via Email: Enhance Engagement Through Shared Collections
- Attaching Files to Support Asset Information
- Copying Assets To Group or Workspace
- Creating 3D Materials
- Creating 3D Materials for Fabrics with Mesh
- Creating Assets
- Creating Assets by Smart Upload
- Creating Assets with APEXFiz File
- Creating Assets with Multiple Fabric Sides
- Customizing Asset’s Cover Image
- Deleting Assets
- Digital Drape Overview
- Downloading 3D Material Files
- Editing An Asset
- Exploring the 3D Viewer
- Export Digital Library Data to Excel
- Importing TextileCloud™'s 3D Material Files Into CLO3D
- Integrate Your System With TextileCloud™ Using APIs (Application Programming Interfaces)
- Mass Data Update and Management
- Mass Upload Data
- Mass Upload Data with Multiple Fabric Sides
- Merge Material for Asset with Face and Back Side
- Navigating the Asset Library on Frontier.cool
- Printing an Asset
- Printing and Customizing Your QR Code Label
- TextileCloud™'s Supported 3D Material Files
- The Asset Library
- Understanding Texture Maps
- Updating Fabric Images with QR Code Labels
- Uploading Pre-Scanned Images
- Best Practices for Filling Mass Upload's Excel Template
- Frontier.cool's Fabric Physical Properties
- Unlock the Power of Eco-Impactor®
- Image Search in Asset Library
- Best Practice to Mass Upload Data and Auto-Update Fabric Images
- Exploring the Key Features of the Thread Board on Frontier.cool
- Navigating Detailed Card Information in the Thread Board Module on Frontier.cool
- Navigating the Thread Board Module in Frontier.cool
- Start a DigitalThread™ Conversation
- Accessing Detailed Fabric Information on Frontier.cool
- Accessing Trade Events and Vendors on Frontier.cool
- Exploring the Sourcing Library Module on Frontier.cool
- Fabric Discovery and Information in the Frontier.cool Sourcing Library
- Transforming Material Sourcing with FabriSelect™
- Creating and Sharing Collection in Fabriselect™
- How to Sign Up and Log In to Fabriselect™
- How to Add Meeting Minutes in FabriSelect™
- Discover the Dashboard in FabriSelect™
- Scan, Save, and Explore with FabriSelect™
- Creating and Managing Custom Sections and Fields
- How to Fill In Custom Sections and Fields
- Managing Dropdown Options in Custom Fields
-
開始使用
個人資料管理
團隊相關
工作區相關
- 建立與存取資料夾
- 將布料新增至工作區的資料夾中
- 分享布料與資料夾
- 管理您的工作區
- 管理工作區中的資料夾
- 在嵌入頁面上建立與管理數位圖書館
- 存取與複製與我分享的資料夾
- 自訂資料夾的封面圖片
- 通過電子郵件聯繫:透過分享資料夾提升互動參與度
- 使用應用程式介面 (API) 將您的系統連接至 TextileCloud™
- 探索布料資產模組
- 如何操作布料資產模組
- 如何建立布料
- 如何使用智慧上傳建立布料
- 如何用上傳已預掃描影像建立布料
- 使用 APEXFiz 檔案建立數位資產
- 了解TextileCloud™所支援的 3D 布料檔案
- 如何建立3D布料
- 如何下載3D布料以供設計或生產流程所需
- 建立網格布料的3D Material
- 編輯您的數位布料
- 自訂布料資產的封面圖像
- 如何列印布料資產的Swatch
- 將布料資產複製到團隊或工作區
- 批量上傳 : 快速建立大量布料流程介紹
- 批量管理:大量更新布料資訊介紹
- 了解紋理貼圖(6 Texture Maps)
- Digital Drape概覽
- 如何列印與客製布料的 QR Code 標籤
- 如何建立雙面或三層數位布料
- 時尚與紡織產業的永續轉型工具: Eco-Impactor®
- 如何刪除布料
- 探索3D檢視器: 布料採購、行銷和設計不可或缺的工具
- 如何使用QR Code標籤更新您的布料資訊
- 如何將TextileCloud™的3D布料檔案導入CLO3D
- 批量上傳 : 上傳雙面或多層布料說明
- 如何將正面布與背面布合併成雙面布
- 如何為布料新增附件使其資訊更為完整
- 如何將數位布料匯出成Excel檔
- Frontier.cool的布料物理數據介紹
- 如何填寫批量上傳的Excel模板
- 布料資產以圖搜圖功能
- 探索Frontier.cool的Sourcing Library 模組
- 探索Sourcing Library中的布料與相關資訊
- 了解Sourcing Library中布料的詳細資訊
- 了解Sourcing Library中的展會展示功能
- 如何註冊並登入 FabriSelect™
- 數位化您的布料採購流程-FabriSelect™
- 探索FabriSelect™ 的儀表板
- 如何使用FabriSelect™
- 如何用FabriSelect™ 建立和分享資料夾
- 如何在FabriSelect™ 建立會議記錄
- 如何更改語言設定
- 如何提交意見反饋或請求
- 管理數位布料的隱私與共享設定
- 資產上傳失敗或被取消的原因
- Frontier.cool會如何保障我的個人資料和數據
- Frontier.cool 如何透過 Eco-Impactor™ 精確生成環境影響數據?
- Frontier.cool是否有提供TextileCloud™的免費試用呢?
- Frontier.cool的TextileCloud™是如何精確地生成布料的物理數據的呢?
- 為何我無法下載與我分享的布料之3D檔案
Deleting Assets
Introduction
There are various reasons you might want to delete assets from your Asset Library’s storage. Perhaps you need to remove outdated or irrelevant assets, organize your assets more efficiently, or simply free up space for new assets. In this article, we will walk you through the process of deleting assets from your Asset Library, ensuring you can manage your digital fabric assets with ease and precision.
How to Delete Assets in the Asset Library
- Go to the Asset Library.
- Select the assets you want to delete by checking the checkboxes in the asset.
You can delete multiple assets in one deletion process, including assets on different pages.
For example, if you want to delete all assets from the 1st page and only 3 assets from the 2nd page in the Asset Library: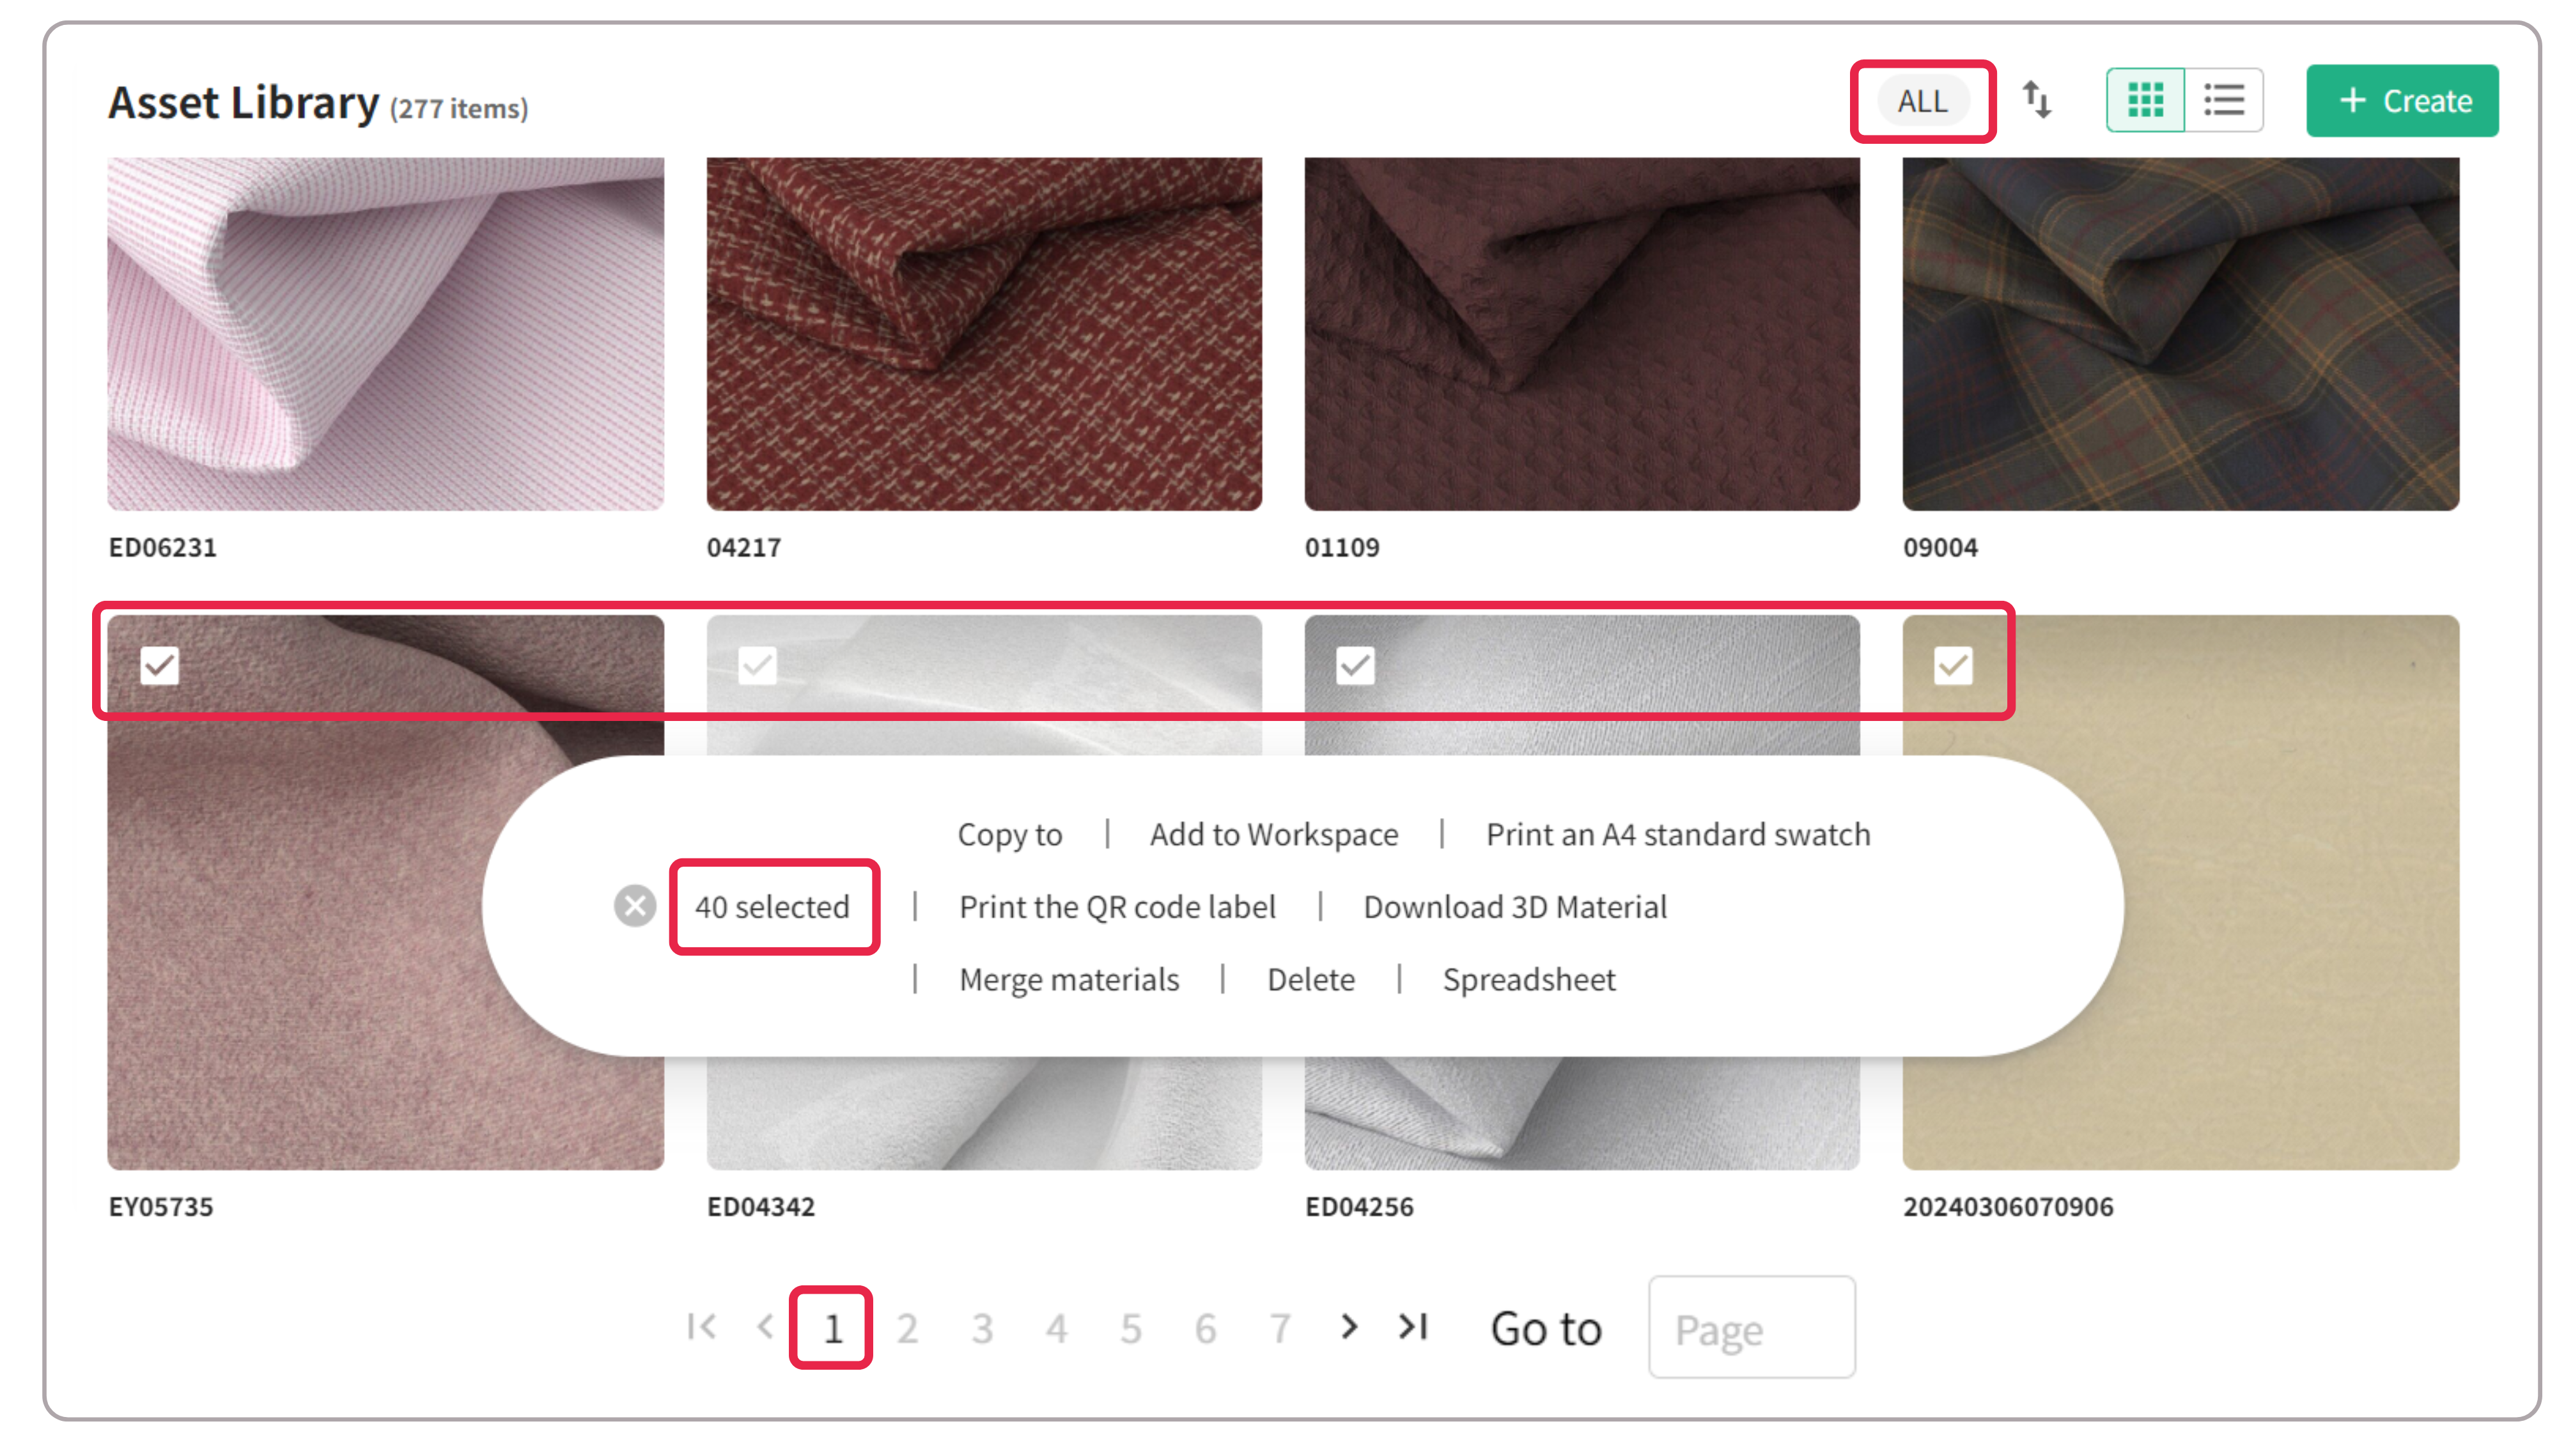
- On the first page, simply click the [ALL] button. Note that clicking the [ALL] button will select all assets on the current page, which consists of a maximum of 40 assets.
- Then, navigate to the second page by clicking 2, and check the checkboxes in the assets you want to delete.
You can review the selected assets; you should now have 43 assets selected.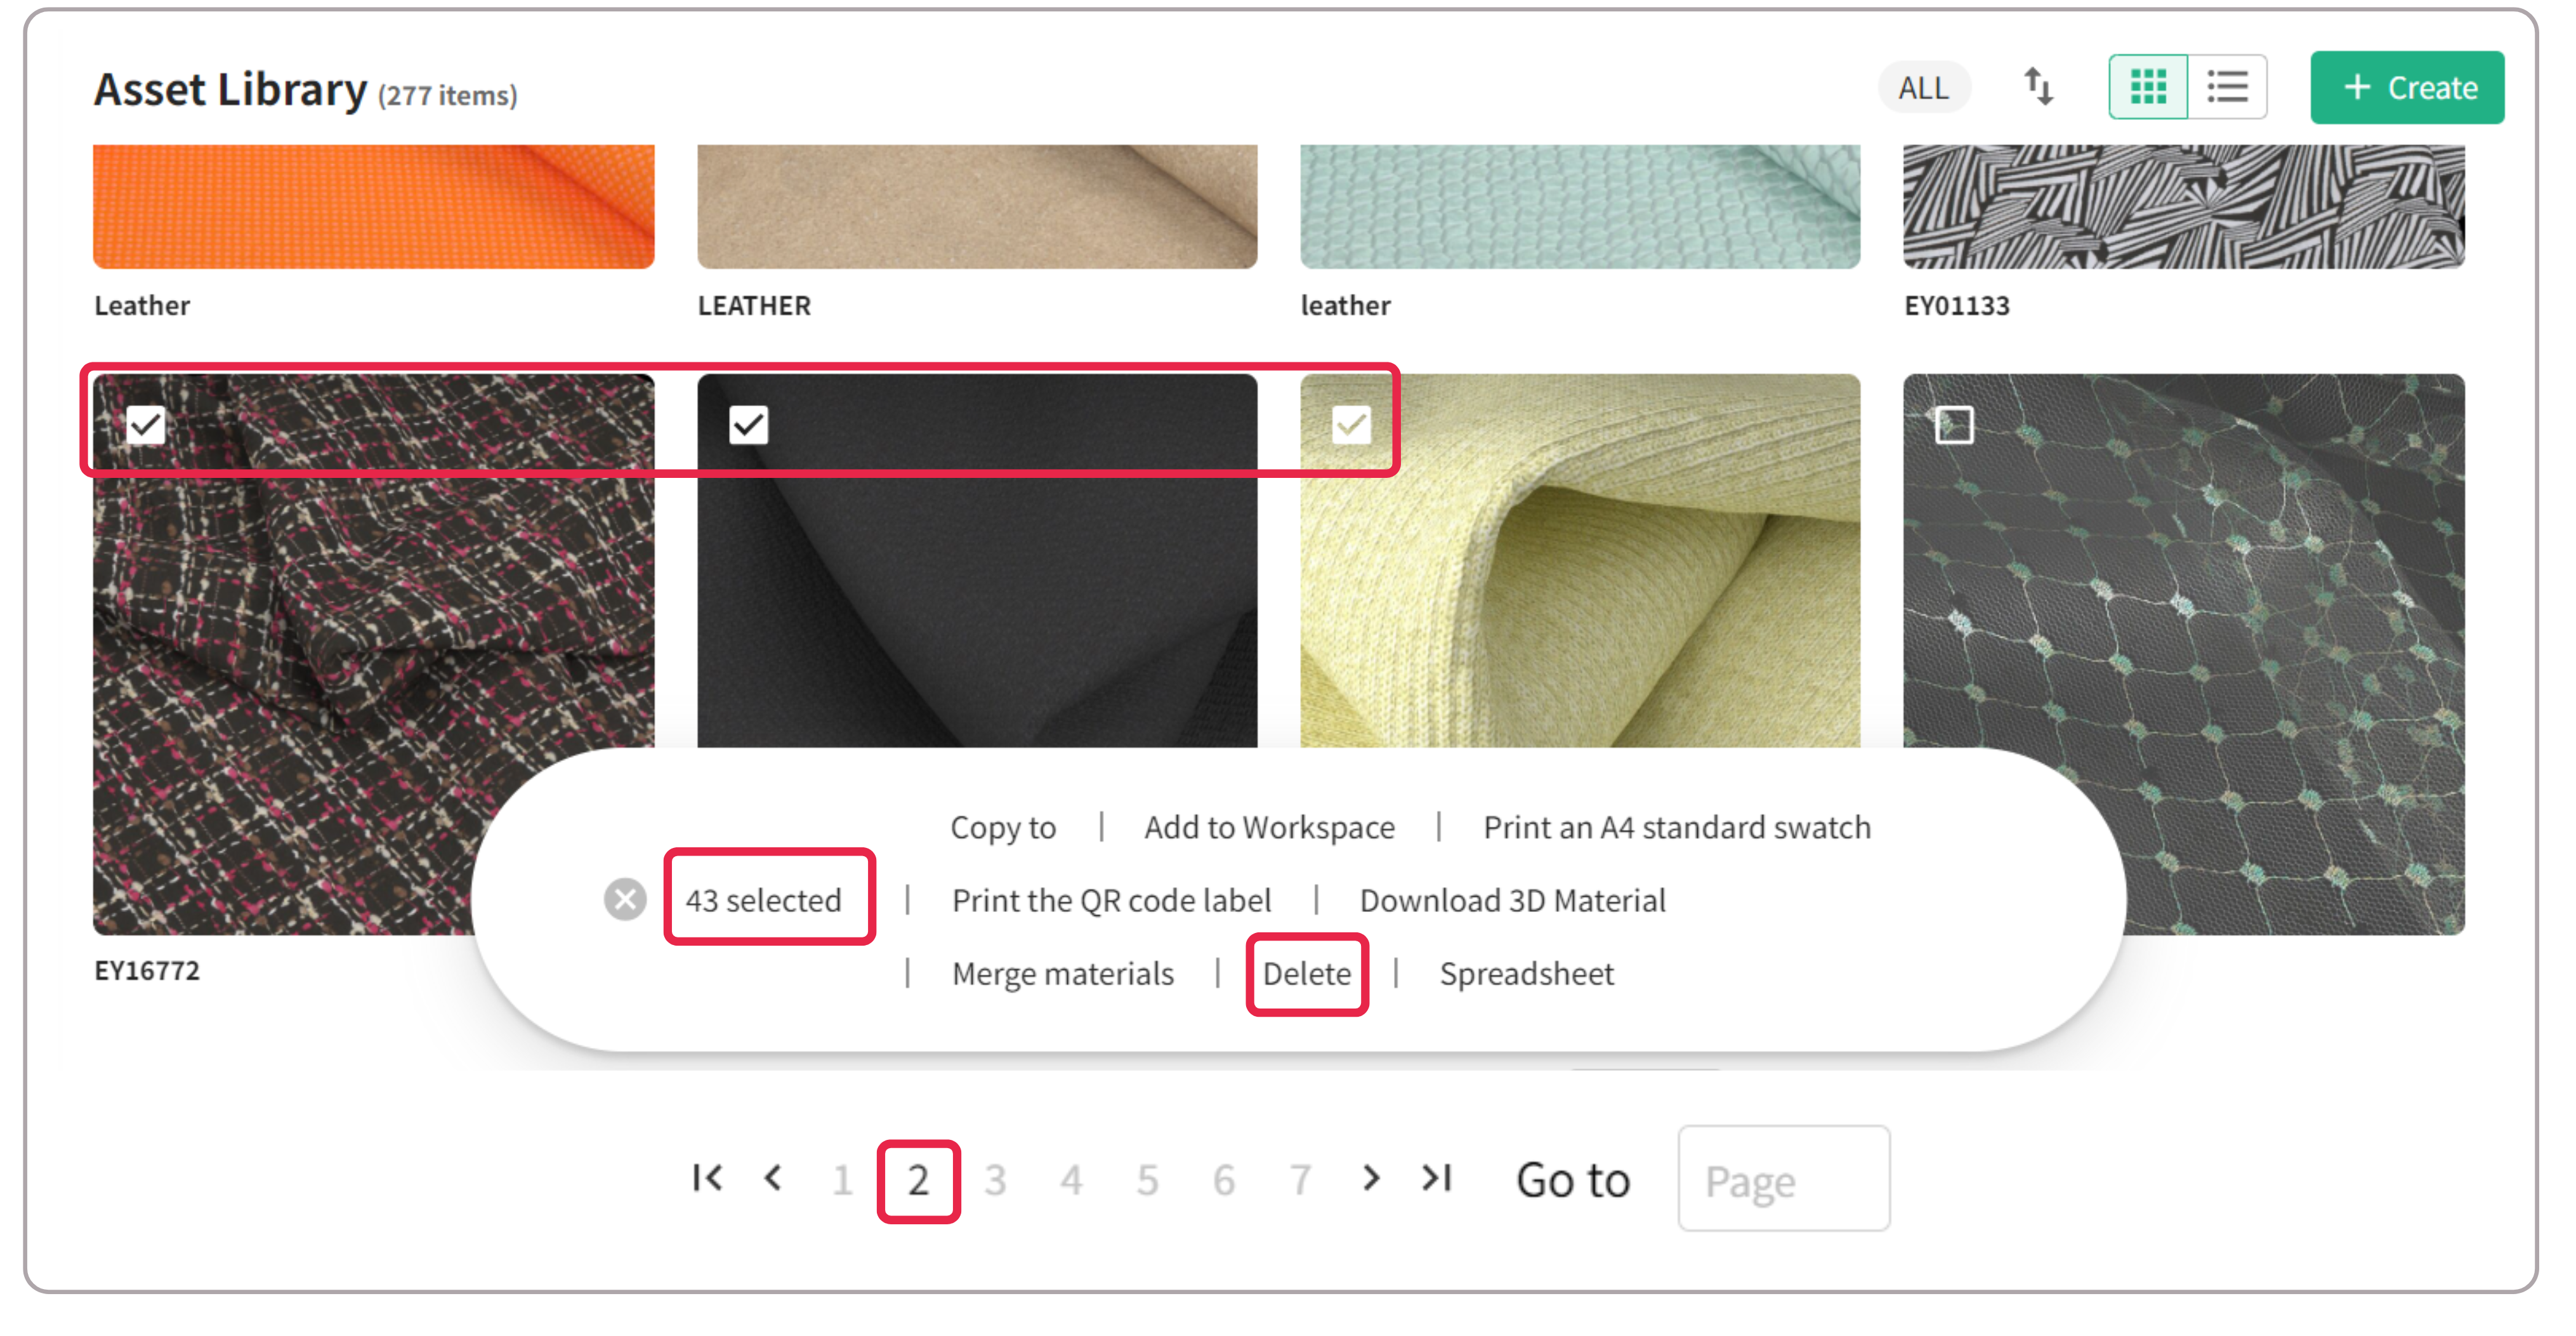
- After you finish selecting, make sure you have correctly chosen the assets you want to delete. Once you click the Delete button, you cannot undo or recover these deleted assets.
- Click the [Delete] button, and then click [Confirm] to complete the deletion process.
Conclusion
Deleting assets from your Asset Library is a straightforward process that helps you manage your digital assets efficiently. By following the steps outlined, you can free up space, remove outdated items, and keep your library organized. It is crucial to verify and double-check your selections before confirming the deletion, as this action is permanent.
Store locator
-
Heading
Add address
-
Heading
Add address
-
Heading
Add address
Example product title
Size
Color
Quantity